


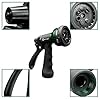


AUTOMAN-Garden-Hose-Nozzle, ABS Water Spray Nozzle with 7 Adjustable Watering Patterns, Slip Resistant for Watering Plants, Lawn& Garden, Washing Cars, Cleaning, Showering Pets & Outdoor Fun.
EUR 7.67 (as of April 25, 2026 11:56 GMT +00:00 - More infoProduct prices and availability are accurate as of the date/time indicated and are subject to change. Any price and availability information displayed on [relevant Amazon Site(s), as applicable] at the time of purchase will apply to the purchase of this product.)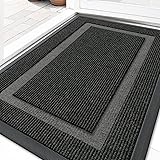


OLANLY Front Door Mat Indoor Outdoor Entrance, Waterproof All-Season, All-Weather Doormat, Sturdy Natural Rubber, Fade Resistant, Low Profile, Easy Clean Patio Porch Entryway Mat, 29.5x17, Black
EUR 8.10 (as of April 25, 2026 16:45 GMT +00:00 - More infoProduct prices and availability are accurate as of the date/time indicated and are subject to change. Any price and availability information displayed on [relevant Amazon Site(s), as applicable] at the time of purchase will apply to the purchase of this product.)How to Choose the Best Soil Cover for Indoor Plants: The Complete 2024 Guide
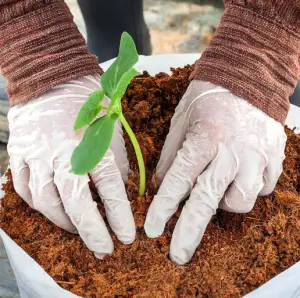
Indoor gardening has surged in popularity in recent years, with millions of people embracing the joy of raising thriving plants inside their homes and apartments. An often overlooked but critical aspect of successful indoor gardening is choosing the right soil cover.
The correct soil cover helps regulate moisture, temperature, and exposure to provide your indoor plants with the optimal growing conditions. With so many options available, from moss and pebbles to decorative stones and bark chips, selecting the best soil cover for your indoor plants can be confusing.
This definitive guide will explore everything you need to know about picking the ideal soil cover for indoor plant health and aesthetics in 2024.
Why Use Soil Cover for Indoor Plants?
Before we dive into the different types, let’s look at why using soil cover is so beneficial:
Regulates Moisture
Soil covers act as a protective barrier between the potting mix and environment. They prevent rapid moisture loss through evaporation, allowing the soil underneath to retain the right amount of moisture your plants need.
Controls Temperature
Some covers like moss and pebbles help insulate the soil, protecting plant roots from temperature fluctuations. This is especially useful for tropical plants.
Enhances Aesthetics
The right soil cover can beautifully complement your indoor decor. Colored pebbles, bark chips, or moss add visual interest to your plants.
Reduces Mold and Fungus Growth
Thick soil covers like moss prevent light from directly reaching the soil surface, inhibiting the growth of mold and fungus.
Keeps Soil Intact
Covers stop the soil from being disturbed when watering or when curious pets explore your plants!
Improves Germination
For seed starting, lightweight covers like vermiculite help retain moisture for better seed germination.
Now that you know why soil covers are beneficial, let’s explore the top options available.
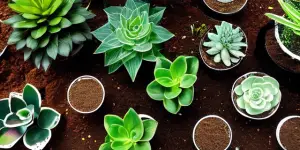
Moss as Soil Cover
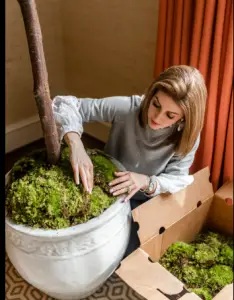
moss one of the most popular and attractive soil covers for indoor plants. Here’s an overview:
Benefits
- Retains moisture well without becoming waterlogged
- Releases moisture slowly to plant roots
- Regulates soil temperature
- Naturally inhibits mold growth
- Softens water flow when watering plants
- Visually appealing green color
Types of Moss
- Sheet moss – Dense sheets used to wrap the soil surface
- Mood moss – Fluffy carpets adding texture
- Spanish moss – Draping gray strands with an aged look
- Reindeer moss – Bright green lichen with a shrub-like appearance
- Sheet moss tends to retain moisture better than other varieties.
Tips for Using Moss
- Soak moss before use to avoid absorbing moisture from the soil
- Wrap sheet moss around edges to prevent fraying
- For a layered look, apply moss sheets then cover with mood moss
- Mix reindeer moss sparingly with other mosses for texture
- Avoid thick layers of moss around succulents or cacti that require fast drainage
With proper maintenance, moss can enhance indoor plants for several years. It naturally composts and replenishes the soil as it decomposes over time.
Pebbles and Gravel for Soil Cover
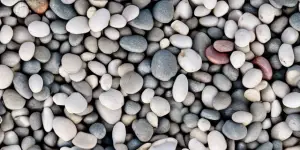
For an understated yet stylish look, pebbles or gravel make excellent soil covering options.
Benefits
- Provide moderate moisture retention
- Allow air circulation to plant roots
- Available in a wide variety of colors
- Smooth rounded edges prevent soil erosion
- Naturally inhibit fungus growth
- Easy to source and apply
Types of Pebbles and Gravel
Pebbles
- River pebbles – Naturally smooth and rounded river rocks
- Tumbled stones – Irregular stones smoothed by tumbling/processing
- Glass pebbles – Recycled glass fragments with shiny finish
- Ceramic pebbles – Artificially colored porcelain pebbles
Gravel
- Decomposed granite – Crushed granite in natural earthy tones
- Marble chips – Crushed white or colored marble fragments
- Lava rock – Porous volcanic lava rocks
- Aquarium gravel – Smoothed colorful pebbles safe for plants
River pebbles, tumbled stones, and lava rock work well for most indoor plants.
Tips for Using Pebbles
- Pick pebbles 1-2 inches in diameter – too small and they fall between pots
- Wash natural pebbles before use
- Layer different sized pebbles for visual interest
- Group a single pebble type by color for a clean look
- Avoid shiny glass pebbles for succulents as they magnify light
The weight of pebbles makes repotting easier. Simply reuse them each time you refresh the potting mix.
Bark and Wood Chips for Soil Cover
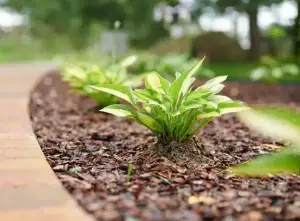
For gardeners seeking a natural woodland aesthetic, bark and wood chips lend organic texture.
Benefits
- Slowly decompose improving soil structure
- Attractive natural appearance
- Allow air circulation to roots
- Provide moderate insulation for steady soil temperature
- Slightly acidic pH beneficial for some plants
Types of Bark and Wood Chips
Bark
- Pine bark – Small reddish-brown pine pieces with tangy scent
- Cypress mulch – Fine soft shreds in rich brown tones
- Cedar bark – Thin rustic cedar strands with pleasant aroma
- Gorilla hair – Coarse black fibers of shredded redwood bark
- Orchid bark – Coconut husk chips ideal for epiphytic orchids
Wood Chips
- Forest floor – Assorted natural wood pieces replicating a forest floor
- Playground chips – Soft fine wood pieces safe for children
- Wood shavings – Thin curled wood shavings
- Cypress chips – Mini flattened chips of cypress wood
Pine bark, cypress mulch, cedar bark, and forest floor chips are suitable for most indoor plants.
Tips for Using Bark and Wood
- Soak excessively dry bark/wood before using
- Avoid packing material tightly – leave space for air circulation
- Maintain even moisture to prevent fungal growth
- Replenish every 2-3 years as pieces decompose
- Use orchid bark only for orchids and succulents, as it retains little moisture
The natural look of bark and wood blends beautifully with potted plants. Select pieces complementing your pots for a cohesive design.
Sand as Soil Covering
Though not commonly used alone, sand can be an ingredient in soil covers needing sharp drainage.
Benefits
- Provides quick drainage, great for succulents and cacti
- Heavy grains prevent float away when watering
- Adds contrasting texture when mixed sparingly with other covers
- Can be sterilized to create “clean sand” free of pests
Types of Sand
- River sand – Smooth naturally rounded grains
- Sharp sand – Coarser sand with angular grains
- Horticultural sand – Very fine grains, ideal for rooting cuttings
- Colored sand – White or brightly dyed sand for decoration
- Mineral sand – Coarse sand containing volcanic minerals
Natural river sand and sharp sand work best as soil toppers.
Tips for Using Sand
- Use sparingly in cactus/succulent mixes for drainage
- Avoid pure sand cover as it compacts readily
- Mix with small pebbles or perlite to improve aeration
- Layer colored craft sand over other covers for pops of color
- Mineral sands may alter soil pH – test before using
When used judiciously in mixes, sand improves soil structure and moisture control.
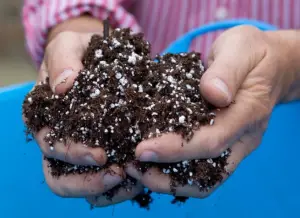
Pumice and Perlite as Soil Covers
Lightweight pumice and perlite add air pockets when used in moderation as soil covers.
Benefits
- Improve soil aeration and drainage
- Help prevent overwatering and root rot
- Perlite buffers soil pH changes
- Light color reflects heat away from roots
- Very affordable and easily sourced
Types
- Pumice – Porous volcanic rock, often used in bonsai soil
- Horticultural perlite – Expanded silica product produced for gardening
- Propagation perlite – Extra fine grade perlite for seed starting
Standard horticultural perlite works well for most indoor plants.
Tips for Using Pumice and Perlite
- Blend sparingly 10-20% with other covers to enhance drainage
- Avoid thick layers as they dry out rapidly
- Horticultural perlite is very light and floats away when watering – mix with other materials
- Moisten before use to prevent perlite from stealing moisture from soil
- Wear a mask when handling as fine dust is irritating if inhaled
When mixed properly, pumice and perlite provide the ideal balance of moisture retention and drainage.
Sphagnum Moss as Soil Topper
Not to be confused with sheet moss, dried sphagnum moss makes an exceptional soil cover.
Benefits
- Absorbs and retains up to 20X its weight in water
- Releases moisture slowly to plant roots
- Has antiseptic properties that prevent root rot
- Natural cushioning action is gentle on roots
- Neutral pH suitable for most plants
Tips for Using Sphagnum Moss
- Soak thoroughly before placing atop soil
- Lightly press down leaving the surface fluffy
- Add more moss as older layers decompose
- Mix with perlite or orchid bark to prevent sogginess
With proper preparation, sphagnum moss helps provide an optimal moisture balance for plant roots.
Grass as Soil Topping
For those seeking a lawn-like look indoors, dried grass clippings can be used sparingly as soil topping.
Benefits
- Fresh green color adds natural appeal
- Releases nutrients as it decomposes
- Provides moderate moisture retention
- Soft texture contrasts nicely with hardscape elements
Tips for Using Grass Clippings
- Use dried and browned grass, not fresh green clippings
- Apply a thin layer, as it compacts heavily when wet
- Mix with dry leaves or moss to improve aeration
- Avoid grass clippings treated with herbicides or pesticides
- Replace regularly as it decomposes rapidly
When used judiciously, grass adds organic matter and nutrients to indoor plant soils as it breaks down.
Leaves for Soil Cover
Dry crushed leaves make excellent mulch for indoor plant soils.
Benefits
- Release nutrients and organic matter as they decompose
- Provide insulation to buffer soil temperature
- Improve moisture retention and slow evaporation
- Natural material easily obtained for free
Types of Leaves
- Oak leaves – Sturdy leaves resist compaction with slow decay
- Magnolia leaves – Broad leaves offer excellent ground coverage
- Maple leaves – Vibrant red leaves add color when partially decomposed
- Ginkgo leaves – Fan-shaped leaves with pretty yellow tones
Dry oak, magnolia, and maple leaves are great choices for most indoor plants.
Tips for Using Leaves
- Select leaves without pest damage or fungal issues
- Dry leaves fully before use to prevent mold growth
- Crush or cut leaves to maximize soil coverage
- Maintain even moisture levels after applying
- Replenish annually as leaves decompose
Leaves contribute organic nutrients to soil as they breakdown. Blend with mosses or bark for additional texture.
Coconut Coir as Soil Topper
Coconut coir makes an excellent soil conditioner and can also be used as a topping.
Benefits
- Retains 8-9 times its weight in water
- Releases moisture slowly to plant roots
- Has natural antifungal properties
- Improves soil structure when incorporated over time
Tips for Using Coconut Coir
- Use the finely shredded “coconut peat” grade
- Soak thoroughly before use to prevent moisture steal from soil
- Apply 1 inch layer and keep evenly moist
- Replace annually as coir decomposes rapidly
- Makes an excellent addition to potting mixes
Coconut coir enhances moisture retention and provides organic matter to soils. It’s suitable for most indoor plants.
Parboiled Rice Hulls for Soil Covering
Parboiled rice hulls may seem unusual but make a remarkably beneficial soil topper.
Benefits
- Allow air flow while retaining moisture
- Resist compaction and improve drainage
- Naturally prevent growth of mold and fungus
- Release silicon and other minerals as they decompose
- Neutral pH suitable for all plants
Tips for Using Rice Hulls
- Use hulls from parboiled, not regular white rice
- Avoid packing tightly, leave space for air circulation
- Replenish annually as hulls break down
- Mix with bark or moss to improve moisture retention
Parboiled rice hulls are an affordable and sustainable soil cover option perfect for the eco-conscious indoor gardener.
Vermiculite as Soil Topping
Though lightweight, vermiculite offers superb water retention when used as a soil cover.
Benefits
- Retains 3-4 times its weight in water
- Releases moisture slowly to plant roots
- Improves nutrient absorption with excellent cation exchange capacity
- Helps prevent soil compaction
- Builds strong roots when combined with peat or coir
Tips for Using Vermiculite
- Look for horticultural grade medium size vermiculite
- Create a 1 inch layer, saturate fully before use
- Mix with peat or coir to balance water retention
- Use alone for seed starting and propagation
- Replace annually as vermiculite decomposes over time
With proper preparation, vermiculite helps provide the constant moisture vital to healthy plant growth.
Crushed Eggshells as Soil Topper
Though an unconventional choice, crushed eggshells make a remarkably beneficial soil addition.
Benefits
- Provide calcium, an essential plant nutrient
- Help regulate soil pH, buffering acidity
- Improve drainage and aeration as shells break down
- Deter slugs and snails with abrasive texture
- Release nutrients slowly as shells decompose
Tips for Using Crushed Eggshells
- Rinse shells thoroughly, dry fully, and grind to a gritty powder
- Mix crushed shells 50/50 with edible crushed leaves
- Apply a 1 inch layer, concentrating around acid-loving plants
- Replenish every 2-3 months as shells rapidly decompose
- Improves blossoms and fruiting in tomatoes and peppers
When used correctly, crushed eggshells can act as an organic calcium supplement for indoor plants.
Key Considerations for Choosing Soil Cover
Now that we’ve covered the benefits of different soil topping materials, keep these key factors in mind when deciding:
- Watering needs – Pick covers that match the plant’s moisture requirements. For example, moss retains more water than pebbles.
- Root protection – Some plants with fine delicate roots thrive best with fluffy covers like moss or grass versus rougher materials.
- Drainage – Fast-draining plants like succulents and cacti do best with loose covers such as sand, perlite, gravel or orchid bark. Avoid moss and peat which retain moisture.
- Aesthetics – Complement your plant pots, furniture and overall decor style with attractive soil covers. Natural wood-look covers, colored sand or glass pebbles can provide pleasing visual contrast.
- Indoor environment – Ensure covers like bark or grass clippings won’t aggravate allergies or respiratory issues. Avoid dyes or treated covers indoors.
- Ease of sourcing – Can you easily and affordably source the soil cover locally? Hard-to-find materials will add time and cost.
- Maintenance – Some covers like sphagnum moss need replacing annually, while pebbles will last many years. Consider longevity and required care.
Recommended Soil Covers by Indoor Plant Type
Here are suggested soil covering combinations for popular indoor plant types:
Orchids
- Orchid bark
- Sheet moss
- Sphagnum moss
- Perlite
Ferns and Tropical Plants
- Sheet moss
- Spaghnum moss
- Coconut coir
- Forest bark
Succulents and Cacti
- Crushed granite gravel
- Horticultural sand
- Crushed lava rock
- Crushed seashells
African Violets and Begonias
- Perlite
- Crushed leaves
- Sheet moss
- Vermiculite
Bonsai Trees
- Mood moss
- Crushed granite
- Small river pebbles
- Pine bark fines
Air Plants
- Orchid Mix (bark/moss/charcoal)
- Forest bark
- Sheet moss
- Crushed seashells
Step-by-Step Guide to Applying Soil Cover
Follow this simple process for properly applying soil covering:
- Select suitable cover materials matching the plant’s watering needs and environmental conditions. Combine 2-3 complementary elements like moss and pebbles for visual interest.
- If needed, pre-moisten dry covers like bark to prevent stealing moisture from soil.
- Pour the coarser, heavier materials like pebbles or gravel first, adding 1-2 inches. Then apply 1 inch of finer covers like moss or grass.
- Pat down gently with hands, leaving the surface layer light and air
- Water thoroughly after applying cover until water drains from the bottom of the pot. This will settle materials and moisten from below.
- Add additional cover around sensitive plants to maintain desired moisture and temperature. Acclimate the plant to less cover over time.
- Periodically check moisture below the cover, watering before the soil dries out completely. Adjust cover thickness and watering to maintain optimal moisture.
- Replenish cover annually or as materials decompose. Gently remove old cover with fingertips and refresh with new layers.
- For decorative covers like colored sand, apply sparingly between other layers or along the outer edges for accent.
- When re-potting plants, reuse old cover materials to minimize waste.
By following these simple steps, you can create the ideal protective and decorative soil covering to keep your indoor plants happy and healthy!
Common Problems and Solutions for Soil Covers
While incredibly beneficial, soil covers can cause issues if improperly applied. Here are some common problems and solutions:
Problem: Cover drying out too quickly
Solution: Increase cover thickness, switch to more moisture-retentive materials like moss/peat/coir, water more frequently.
Problem: Cover staying soggy, leading to root rot
Solution: Reduce cover thickness, incorporate more sand/perlite/gravel to improve drainage, water less frequently.
Problem: Cover blowing away with fans or AC
Solution: Use heavier materials like pebbles/wood chips, avoid lightweight items like perlite near vents.
Problem: Mold growing on cover surface
Solution: Remove and replace cover, improve ventilation, water less, add sand/gravel to top layer.
Problem: Gnats or fungus developing in cover
Solution: Replace cover, apply light layer of sand, treat soil with fungicide/insecticide if needed.
Problem: Cover floating away when watering heavy
Solution: Apply pebbles/gravel first to weigh down lighter materials, water gently to prevent displacing cover.
Problem: Pets or children disrupting cover
Solution: Use heavier materials less easily scattered. Add decorative accents like sticks atop cover to discourage digging.
With attentive care and periodic adjustments, you can troubleshoot any issues that arise with soil covers.
Frequently Asked Questions About Soil Covers
Here are answers to some commonly asked questions about soil covers:
Can I use rocks or pebbles alone as soil cover?
Pebbles or rocks alone do not retain much moisture. Combine them with moss or bark to provide better moisture control.
How often should soil covers be replaced?
Replace organic covers annually as they decompose. Inorganic covers like gravel can last several years if maintained properly.
Should I put down fertilizer before or after applying cover?
Always fertilize potting mix as needed before applying cover material. Covers can make it challenging to evenly distribute fertilizer atop the soil.
Can I use fabric or landscape fabric instead of soil cover?
Fabric inhibits air and water flow. Natural porous covers like moss work better. Fabric also appears unsightly as it deteriorates over time.
Is activated charcoal good for covering indoor plant soil?
Outdoors activated charcoal can provide benefits. However, indoors it easily becomes mud-like and makes repotting difficult. Natural covers work better.
What depth of soil cover should I apply?
2-3 inches of pebbles, bark, moss or similar materials is ideal. Avoid covering too deeply or it can block air and light from reaching plant roots.
Enjoy the Benefits of Soil Cover for Your Plants
Adding the right soil cover can be transformative for your indoor plants, helping control moisture, temperature, and exposure to keep them thriving happily. Take the time to assess each plant’s needs and select suitable materials that will provide the perfect growing environment.
While it does require periodic maintenance, soil covering is an incredibly rewarding practice that results in beautiful, vibrant indoor plants you’ll be proud to display. Use this guide to make informed choices tailored to your plants and indoor space.
Remember to have fun experimenting with different natural materials and combinations. The possibilities are endless when it comes to creating living works of art accentuated by the perfect soil cover!


Flexi Hose Expandable Garden Hose with 8 Function Nozzle, 25FT - Lightweight Retractable Garden Hose, Water Hose - No-Kink Flexibility, 3/4 Inch Solid Brass Fittings and Double Latex Core
EUR 38.39 (as of April 25, 2026 19:02 GMT +00:00 - More infoProduct prices and availability are accurate as of the date/time indicated and are subject to change. Any price and availability information displayed on [relevant Amazon Site(s), as applicable] at the time of purchase will apply to the purchase of this product.)


