


All Natural Peppermint Oil Insect & Pest Control Spray Repels Mice, Spiders, Ants, for Home, Indoor, Outdoor, Garden Maximum Strength Smart Grower Ready to Use 16 FL OZ
$21.95 ($1.37 / Fl Oz) (as of July 9, 2025 22:02 GMT +00:00 - More infoProduct prices and availability are accurate as of the date/time indicated and are subject to change. Any price and availability information displayed on [relevant Amazon Site(s), as applicable] at the time of purchase will apply to the purchase of this product.)


Neck Fan with Mist Spray-Neck Fans that Blow Cold Air,Folding 4000Mah Portable Personal USB Rechargeable Battery Operated Fan with Mister,Cooling Bladeless Travel Misting Fan for Neck Around Black
$29.98 (as of July 9, 2025 22:02 GMT +00:00 - More infoProduct prices and availability are accurate as of the date/time indicated and are subject to change. Any price and availability information displayed on [relevant Amazon Site(s), as applicable] at the time of purchase will apply to the purchase of this product.)How to Care for an Aloe Vera Plant Indoors: The Complete Guide
With their striking succulent leaves and healing gel properties, aloe vera plants make fantastic low-maintenance indoor companions. Caring properly for your aloe ensures it thrives for years while having a ready supply of gel right on hand for minor burns, wounds, or skin irritation.
This guide will cover everything needed to help your aloe vera plant flourish indoors, including:
- Light and location considerations
- Watering best practices
- Soil and pot recommendations
- Fertilizer guidance
- Pruning and propagation tips
- Pest and disease troubleshooting
- Harvesting aloe gel
Follow these indoor aloe vera plant care tips and you’ll have a beautiful, useful perennial houseplant that enhances any space while improving wellness through its soothing gel.
Overview of Indoor Aloe Vera Care Needs
Here is a quick reference table outlining optimal growing conditions for aloe vera plants:
| Factor | Recommendations |
|---|---|
| Light | Bright indirect or partial sun |
| Water | Allow soil to dry between waterings |
| Temperature | 65°F to 80°F |
| Humidity | 40% to 60% |
| Soil | Well-draining cactus/succulent mix |
| Pot | With drainage holes using terra cotta or plastic |
| Fertilizer | Diluted balanced liquid or slow-release spikes every 2-3 months during growth |
| Propagation | Offset pup removal and re-planting |
As a succulent, aloe vera plants don’t need constant moisture and prefer brighter warmer environments reminiscent of their subtropical origins. But they adapt wonderfully to create an attractive low-maintenance indoor plant perfect for windowsills.
Now let’s dive into more details starting with lighting needs.
Providing Proper Indoor Light for Aloe Vera Plants
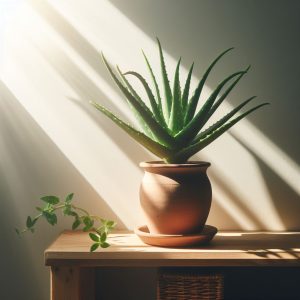
Aloe vera plants thrive best in indoor locations receiving abundant bright, indirect sunlight filtered through transparent window coverings. Ideal options include:
- South facing windows
- West facing windows
- East-facing windows in cooler climates
- North facing supplemented with grow lights
Aloes can tolerate a few hours of morning direct sun but extended harsh afternoon rays will damage leaves. Monitor for reddening, brown crispy patches, or yellowing as signs to adjust light intensity.
If keeping your aloe vera plant in lower light rooms, utilize supplementary grow lights from flexible gooseneck lamps with daylight spectrum bulbs. Position these several inches above the aloe leaves to mimic perfect brightness. Timer automation help ensure consistent daily intervals without overdoing duration.
In their native African habitat, aloes enjoy year-round exposure to intense sun. So replicating analogous conditions indoors keeps growth and function strong even through temperate winters. Just control direct beam intensity to prevent leaf scalding.
Water Requirements for Indoor Aloe Vera Plants
One advantage of aloe vera is its adaptability to irregular watering patterns. These succulents prefer fully drying out between occasional deep soakings. Use these tips to optimize moisture control:
- Allow potting soil to fully dry 1-2 inches deep before the next watering
- Water deeply until it drains freely from the bottom when the soil is dry
- Pour room-temperature filtered water gently around the base of the plant
- Mist leaves occasionally for added humidity
- Reduce watering frequency in winter during dormancy
Soak thirsty aloe vera plants until water pours from the drainage holes out below. This ensures its roots get fully hydrated since aloes originated in arid deserts. But allow all excess moisture to evaporate before wetting again.
Plump firm leaves signal an aloe vera plant getting ample water when active in growth phases. At the same time, shriveled thinner leaves require boosting hydration immediately.
Ambient Temperature & Humidity Recommendations
For indoor spaces, aloe vera plants grow best with:
- Temperatures between 65°- 80°F
- 40%-60% ambient humidity
Warmer bright rooms keep aloe vera leaves plump and lush while cooler shaded areas often indicate dormancy periods where watering reduces.
Humidity levels around 50% work well. Higher range if the surrounding air stays drier from heating systems. Lower-end humidity suffices in more humidified climates.
Ventilation circulation ensures fresh air reaches plants while preventing moist stale conditions that might increase disease vulnerability if overdone.
Ideal Soil for Potting Aloe Vera Plants
Picking the right potting medium establishes healthy foundations supporting aloe vera growth. Look for:
- Well-draining mixes – Critical to preventing soggy roots
- Gritty sandy textures – Mimic native desert soil density
- Soilless succulent blends – Store-bought or homemade
- Terra cotta amendments – Added porous shards to improve drainage
- pH 6.5-7.5 – Neutral levels are tolerate best
Commercial cactus and citrus soils work well by blending organics with sand, perlite, gravel, or wood pieces for aeration. Or create your mixture using:
- 1 part potting soil
- 1 part perlite or coarse sand
- 1 part peat or compost
This loose, fast-draining soil prevents trapped moisture while still retaining some nutrients.
Choosing the Right Planter or Pot
Beyond soil considerations, picking an appropriate pot setup allows better hydration control:
| Pot Material | Benefits |
|---|---|
| Terra Cotta | Natural porosity; moisture-wicking |
| Ceramic | Decorative visuals with drainage |
| Plastic | Inexpensive; lightweight portability |
| Concrete | Stylish modern look if unsealed |
Other tips regarding planters include:
- At least one large drainage hole in the base
- Match diameter to root mass, only size up gradually
- Decorative outer pots can elevate plain nursery ones
- Ensure stability with saucers protecting surfaces below
Choosing pots with drainage holes becomes critical to prevent water logging roots adapted for desert aridity. Bottom watering also helps hydrate from below soil level up to establish consistent moisture gradients.
Fertilizer Requirements
During active growth and maturity phases, adding diluted liquid fertilizer every 2-3 months provides nutrition boosts if soilless potting mixes lack amendments:
- Balanced all-purpose formulas – Such as 10-10-10 or 20-20-20 combinations
- Quarter strength dilutions – To avoid salt buildup burning succulent roots
- Bloom boosters in late winter – For seasonal growth spurts
- No fertilizer during dormancy – Late fall into winter
Slow-release pellet mixes also work well by dissolving nutrients gradually without concentration spikes. Sparingly sprinkle spikes around the aloe vera plant’s base just before the growing seasons.
When aloe leaves thin and new pups emerge slowly, resume fertilizing to nurture regeneration. While lush, vibrant plants require less supplemental feeding overall.
Pruning & Propagating Aloe Vera Plants
Eventually interior lower leaves age on mature aloe vera plants. Pruning yellowing or dried foliage keeps their appearance neat while regulating growth patterns.
- Remove lower leaves – Pruning oldest leaves balances new emergence
- Cut at the base – Slice older leaves off cleanly at soil level using sterilized shears
- Propagate pups – Separate and re-plant offsets from the mother plant
- Allow callusing cuts – Dry severed ends before re-planting to prevent rot
Pruning also generates beneficial harvestable leaf material for accessing soothing inner gel. Just be careful not to over-trigue healthy green tissue until mastering precision.
For propagation, carefully detach offset “pups” generated on stalk sides then allow callusing before re-potting so fresh wounds seal. This clones new plants identical to the parent specimen.
Troubleshooting Aloe Vera Pest or Disease Issues
Aloe vera plants stay fairly resistant to most indoor garden pests. But occasionally you may encounter:
- Overwatering root rot – Ease back moisture levels once soil drains slower
- Mealybugs – Remove with a cotton swab dipped in alcohol
- Aphids – Wipe leaves down with insecticidal soap and prune damage
- Fungus gnats – Let soil fully dry between waterings to disrupt lifecycles
Catching infections early keeps aloe vera houseplants thriving smoothly for decades with minimal required rehabilitation.
Harvesting Aloe Vera Gel from Leaves
The most exciting benefit of growing aloe is having pure soothing gel easily available from those plump triangular leaves.
- Choose mature outer leaves – The largest most developed ones contain abundant gel
- Slice leaf lengthwise – With a sterile knife, cut along one edge without penetrating too deeply
- Collect gel – Gently scrape out the viscous clear gel from one flap using a spoon
- Apply gel – Directly coat irritated skin areas with fresh gel
- Foster regeneration – Remaining inner leaf tissue quickly seals up and replenishes gel
Always harvest conservatively from mature leaves without impacting the plant’s health so it keeps producing helpful gel year after year.
Final Tips for Keeping Aloe Vera Plants Thriving
Caring properly for indoor aloe vera only requires respecting a few straightforward parameters aligned with these desert-loving succulents’ natural preferences:
- Soak thoroughly then allow the soil to dry
- Bright indirect sunlight prevents burning
- Well-aerated gritty soil mixes
- Moderate indoor temperatures around 70°F
- Occasional liquid fertilizer feeds
- Prune aging lower leaves
- Harvest gel from fully developed leaves
Get your aloe vera care basics established, then enjoy this resilient plant gracing your living spaces for decades to come!


Fiskars 3-Claw Stand Up Weed Puller Tool, Gardening Weeder, Hand Weeding Tool with 39" Long Ergonomic Handle with Easy-Eject Mechanism
$34.79 (as of July 9, 2025 22:02 GMT +00:00 - More infoProduct prices and availability are accurate as of the date/time indicated and are subject to change. Any price and availability information displayed on [relevant Amazon Site(s), as applicable] at the time of purchase will apply to the purchase of this product.)
